
Cooking with Cannabis: The Complete Kitchen Guide
Making your own cannabis edibles is rewarding, cost-effective, and gives you far more control than buying pre-made products. You pick the strain, the dose, the recipe, and the result. But homemade cannabis cooking also has real pitfalls — mostly around dosing accuracy and decarboxylation. This guide walks through everything from the basic infusions to final recipes, with an honest breakdown of what's hard, what's easy, and how to avoid the mistakes that ruin most first attempts.
The Two Steps of Cannabis Cooking
Every cannabis recipe follows the same two-step structure:
1. Decarboxylation — activating the cannabinoids with heat.
2. Infusion — dissolving the activated cannabinoids into a fat or alcohol.
After these two steps, you have an ingredient (cannabutter, cannabis oil, or tincture) that can be used in any recipe that calls for butter, oil, or alcohol.
Step 1: Decarboxylation
Cannabis must be heated before it will produce psychoactive effects in edibles. Raw flower contains THCA, not THC — and THCA doesn't produce a high. For the full breakdown of why and how, see our dedicated decarboxylation guide. The short version: break up your flower, spread on a parchment-lined baking sheet, and bake at 240°F (115°C) for 30–40 minutes. Let it cool before using.
Step 2: Choosing Your Infusion Base
Cannabinoids are fat-soluble and alcohol-soluble, so you can infuse them into almost any fat or high-proof alcohol. The most popular choices:
Butter — the classic. Makes "cannabutter," the foundation of most baked edibles.
Coconut oil — high fat content, solid at room temperature, works well for capsules and baking.
Olive oil — good for savory cooking, salad dressings, and no-bake recipes.
MCT oil — very high fat absorption, mild flavor, great for tinctures and capsules.
Alcohol — for tinctures only. See our cannabis tinctures guide.
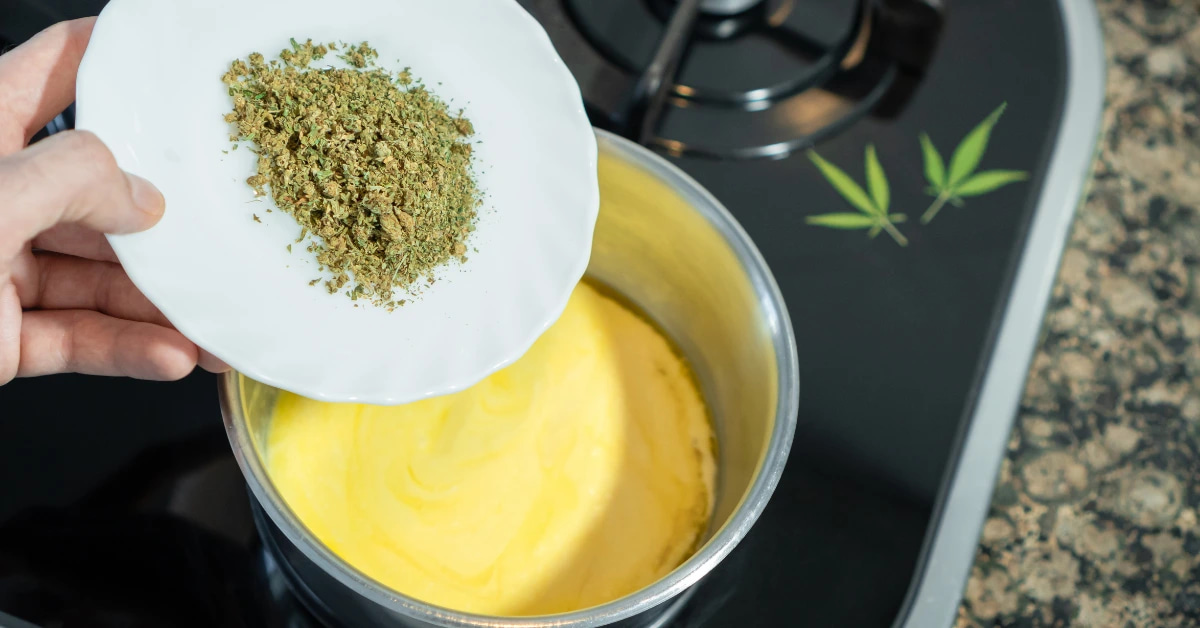
How to Make Cannabutter
This is the single most useful cannabis cooking skill. Once you can make cannabutter, you can make any baked edible recipe.
What You Need
1 cup unsalted butter
7–10 grams decarbed cannabis flower (adjust for desired potency)
1 cup water
Saucepan, cheesecloth or fine mesh strainer, storage container
Instructions
1. Melt butter with water in a saucepan over low heat. The water prevents burning and helps extract.
2. Add decarbed cannabis and stir to combine.
3. Simmer gently for 2–3 hours on the lowest heat. Never let it boil. Stir occasionally. The mixture should be just warm enough to see occasional small bubbles.
4. Strain through cheesecloth into a storage container. Squeeze gently to get the last of the butter out, but don't press too hard — you'll push through plant material and bitterness.
5. Refrigerate until the butter solidifies on top of the water. Lift the butter disc off the water and discard the water.
6. Store in the refrigerator for up to 2 weeks, or freeze for up to 6 months.
How to Make Cannabis Oil
The process is nearly identical to cannabutter, but you skip the water step because oil doesn't separate:
1. Combine decarbed cannabis and oil in a saucepan or slow cooker.
2. Heat on the lowest setting for 2–3 hours (stovetop) or 4–6 hours (slow cooker). Never exceed 245°F.
3. Strain through cheesecloth.
4. Store in a dark container. Coconut oil keeps for months in the fridge; olive oil for weeks.
Dosing Homemade Cannabis Edibles
This is the hardest part of cooking with cannabis. It's also the most important. Here's the math:
Rough Potency Calculation
1. Find the THC percentage of your flower (on the label or COA).
2. Convert to mg per gram: multiply percentage by 10. A 20% flower contains ~200mg THC per gram.
3. Multiply by grams used: 7 grams of 20% flower = 1,400mg total THC.
4. Account for decarb losses: typically 10–15%. Round down to roughly 1,200mg.
5. Account for infusion losses: typically 20–40%. Round down to roughly 800mg in the final butter.
6. Divide by servings: If your cannabutter went into 16 brownies, each brownie contains roughly 50mg THC.
Important: these numbers are rough estimates, not precise measurements. Home infusion efficiency varies based on technique, heat, time, and starting material. The safest approach: start with small servings and wait before eating more. For dosing guidance, see our cannabis edibles dosage guide.
Tips for Better Homemade Edibles
Make smaller servings. Instead of a standard brownie pan, cut pieces in half or quarters so a "serving" is a smaller dose.
Label everything. Store in clearly marked containers so no one accidentally eats a regular snack thinking it's cannabis — or vice versa.
Test your first batch carefully. Try a small piece and wait 2 hours. Use that reaction to calibrate future doses.
Use lower-potency flower. For homemade, you don't need 30% THC flower — mid-tier works well and is cheaper.
Don't rush the infusion. Low and slow produces much better extraction than high heat.
Add lecithin. Sunflower or soy lecithin (about 1 teaspoon per cup of butter) can improve bioavailability and absorption.
Simple Recipes to Start With
Brownies
The classic entry point. Replace the butter in any boxed brownie mix with an equal amount of cannabutter. Follow the package instructions. The box's own sugar and chocolate will mostly mask the cannabis flavor.
Chocolate Chip Cookies
Same approach — replace butter with cannabutter in any standard recipe. Keep oven temperature at or below 350°F; higher temperatures can degrade some THC.
Pasta Sauce
Cannabis-infused olive oil can be stirred into pasta sauces, drizzled on pizza, or used as a finishing oil. Add it off-heat to preserve potency.
Salad Dressing
Combine cannabis olive oil with vinegar, salt, mustard, and herbs. No-cook means no potency loss.
Capsules
Fill gelatin capsules with cannabis oil for a no-food, precise-dose option. Use a capsule-filling tray for consistency.
Mistakes to Avoid
Skipping decarboxylation: Results in edibles that don't work.
Boiling the infusion: High heat degrades cannabinoids. Keep it at a gentle simmer.
Grinding cannabis too fine: Creates bitter, chlorophyll-heavy edibles. Break up, don't pulverize.
Squeezing the cheesecloth too hard: Extracts plant material you don't want.
Eating more after 30 minutes: Edibles take up to 2 hours to kick in.
Storing without labels: Creates risks for family members, guests, and pets.
Frequently Asked Questions
Do I need special equipment?
No. A saucepan, cheesecloth or a fine mesh strainer, and a storage container is all you need. Slow cookers and sous vide machines make the process easier but aren't required. Dedicated cannabis infusion machines exist and can automate everything if you cook edibles often.
How potent will my edibles be?
Highly variable. Expect 60–80% efficiency from flower to final product under normal home conditions. Commercial edibles are more precise because manufacturers use standardized extraction and testing.
Can I use trim instead of flower?
Yes — trim is a cost-effective option for making cannabutter. Potency will be lower than with flower, but for cooking it's often a better value.
Will my house smell like cannabis?
During decarboxylation, yes — strongly. During the infusion, less so. Sous vide methods avoid the smell entirely. Open windows and run an exhaust fan if discretion matters.
How long does cannabutter last?
Refrigerated, 2 weeks. Frozen, up to 6 months. Store in airtight containers.
Can I decarb in the infusion step instead of separately?
Partially. Long simmering in fat does provide some decarboxylation, but it's less complete than a dedicated decarb step. For best results, always decarb first.
The Bottom Line
Cooking with cannabis is not complicated once you understand the two fundamental steps: decarboxylate, then infuse. Cannabutter and cannabis oil are the building blocks for everything else, and they're as simple as simmering flower in fat for a few hours. The main challenge isn't the cooking — it's the dosing. Start small, label everything, and remember that edibles take time to kick in.
Shop flower, trim, and infusion-ready products at Bloom Ohio or Bloom Maryland.